SmartDoor
The SmartDoor component is a powerful and versatile mechanism designed to enhance the functionality of doors in Unity game development. This component is part of the Door System plugin, providing deve
Settings (v2)

Drag and Drop your settings file. The settings file is a Scriptable Object that allow you to customize Gizmos colors or to show/hide them. By default Door System is shipped with "DoorSystemSettingsDisplayAll" ScriptableObject.

Display Warning: Check to display Door System specific warnings
Is Area Displayed: Check to display Detection Area wireframe
Area Color: Detection Area default color
Area Active Color: Area color when GameObject is detected
Is Hinge Displayed: Check to display door's hinge
Hinge Radius: Radius of the Gizmo sphere representing the hinge
Is Bound Displayed: Check to display your Mesh bounds. Can be useful when trying to understand how hinges are positioned on your door.
Bounds Color: Bounds default Color.
Door GFX section (v2)
In this section you can use a Button to flip horizontally your door.
In fact, it will just rotate by 180 degrees your mesh on its Y axis, so your door needs to have the 2 same sides to look nice. A negative scale has been considered but will lead to issues with GameObject's Box Collider.

Hinge section
In this section, you have the flexibility to set the hinge position for your door.
Dealing with the mesh origin can be challenging, especially when it’s not correctly positioned. Often, changing it becomes a hassle, requiring external software like Blender for adjustments and exporting back to Unity.
SmartDoor simplifies this process. As your mesh object is a child of another GameObject, SmartDoor intelligently repositions both the child and the parent, ensuring a well-placed hinge.
SIMPLIFIED CONTROLS

Placement Method (v2): Use Renderer Bounds or Collider Bounds to place Hinge. On some assets, Collider's Bounds are more appropriate than the Renderer's. You have to click on one of the Buttons after changing the Placement Method.
Buttons: Easily set the hinge position by clicking on one of the available buttons.
GFX Pivot Point: If your original Pivot Point was accurately placed, restore it with a simple click on this button.
Hinge Offset: Fine-tune the hinge position to perfection.
Hinge Rotation: Fine-tune the hinge rotation to perfection.
Auto update: Move Hinge along the local Z axis to prevent door penetrating into walls
Motion Section
In this section, you can define the type of motion your door should have.
Upon Door System 2.0, you will to enter in Configuration Mode to edit your Door. Once you finished, Save and then Exit Configuration Mode. Leaving Configuration Mode without saving first will cancel you modifications.
When you select another GameObject Configuration Mode is automatically closed.


Configure Door (v2): Enter in Configuration Mode to edit your door's motion.
Save [...] button (v2): Save your modifications.
Finish Editing: Exit Configuration Mode.
Door Motion: Choose between Rotation or Move. Rotation is the default.
Axis (only with Rotation): Select the local axis for rotation. Rotation occurs on one axis only, defaulting to Y.
Open Angle (only with Rotation): Set the angle when the door is fully open, relative to the Close Rotation value. Default is -90.
Open Forward (only with Rotation): Enable for the door to always open in the forward direction of the triggering GameObject (usually the Player). Disable for consistent opening in the same direction. Default is enabled.
Use Open Angle as Open (v1, only with Rotation): Click to use the specified “Open Angle” as the open angle.
Use Current Rotation as Close (v1, only with Rotation): Click to use the current rotation of your GameObject as the close value. Note that it uses the visible rotation in the Transform component.
Invert for Paired Door (only with Move): Invert movement for the Paired Door if applicable. Useful for scenarios where the Master Door moves left, and the Paired Door moves right (e.g., sliding doors).
Use Position as Open (v1, only with Move): Click to use the current position as the Open Position. Note that only the delta with the Close Position will be retained, so Close Position must be defined first.
Use Position as Close (v1, only with Move): Click to use the current position as the Close Position. It uses the world position.
Close Door & Open Door: Preview the close/open position/rotation.
Detection Area Section
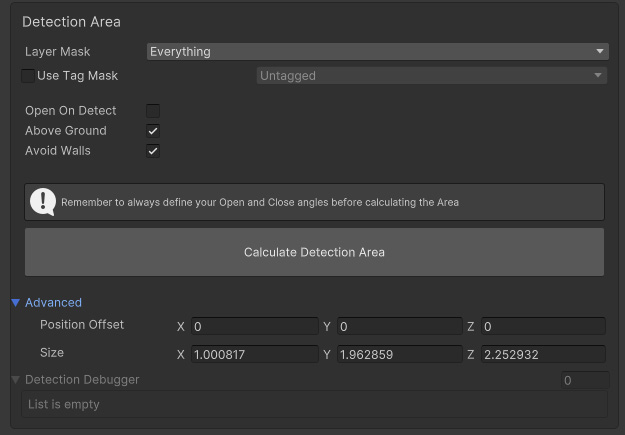
This section manages the Detection Area, crucial for Auto-Close and Auto-Open functionality.

When enabling Auto-Close (refer to the Auto-Close section), it’s essential to ensure that passing GameObjects are out of reach during door closure to avoid jittering. DoorSystem provides two powerful tools:
Detection Area Calculation: Determines an area where the door won’t close if any GameObject is detected inside it.
Real-time Detection Display: Shows detected GameObjects directly in the Editor, eliminating the need to enter Play Mode.
The Detection Area considers your door size, Close and Open position/rotation, providing accurate estimations in most cases. For specialized requirements, fine-tuning options are available.
CONFIGURATION OPTIONS:
Layer Mask: Select the layers for detection. Defaults to Everything.
Use Tag: Filter GameObjects by Tag. Only those with the specified Tag are considered.
Open On Detect: Automatically open the door when a detection occurs.
Above Ground: Elevate the detection area slightly to avoid detecting the ground.
Avoid Walls: Reduce Area size on the X-axis slightly. Disabled if the door opens beyond 90 degrees.
Advanced: Manually set size and position offset for the Detection Area.
Detection Debugger: A tool displaying detected GameObjects with information like detected GameObject, Layer, Tag, and Position.
Note: The Debugger displays all GameObjects meeting the Layer Mask condition. If GameObjects don’t match the Tag condition, their Tag will be displayed in Red, indicating they won’t be considered as detected.
Animation Section
This section provides a quick and straightforward method to animate your door motion using curves.

Open Delay (v2): Timeout before opening the door. Unlock Events are triggered before this timeout.
Open Duration: Set the duration of the Open animation.
Open Animation Curve: Choose the curve for the Open Animation. Feel free to use any of the provided presets.
Close Duration: Set the duration of the Close animation.
Close Animation Curve: Select the curve for the Close Animation. Feel free to use any of the provided presets.
Queue Next Action: By default, if the door is opening, Player closing requests are ignored. Enable this option to close the door once the open animation completes (or to open it once the Close Animation is finished).
Pairing Section
This section enables you to pair a second SmartDoor with your current door, especially useful for double doors.

Paired Door: Select the SmartDoor you want to pair.
Copy Animation: Copy all animation settings to the Paired Door. Default is checked.
Copy Hinge Position: Copy all hinge settings to the Paired Door. Note that the hinge position will be inverted for your Paired Door. Default is checked.
Invert Rotation (v1): Invert Paired Door rotation on its Y axis.
Copy Motion: Copy all motion settings to the Paired Door. Default is checked (Highly recommended).
Align Buttons: Convenient tools to position your Paired Door next to your Master Door.
Note: Ensure there is no space between your two doors for the correct Detection Area size. If space is needed, fine-tune the size in the Detection Area section.
Auto-Close Section
Automatically close your door once the detected GameObjects exit the Detection Area.

Auto-Close Door: Enable this feature. Default is enabled.
Delay: Wait time after GameObjects have fully exited the Detection Area.
Lock System Section
In this section, you can lock/unlock your door using a versatile system compatible with any custom locking mechanism. The key property to update is SmartDoor.isLocked.
While Door System wasn’t initially designed to include a Locking System, a simple component, SmartKey, has been created for easy door locking/unlocking in your game without the need for additional code. See SmartKey for more information.

Is Locked: Enable to lock your door. If a door is locked, the
OpenDoor()method will early return, preventing the door from opening. Default is disabled.
Unity Events Section

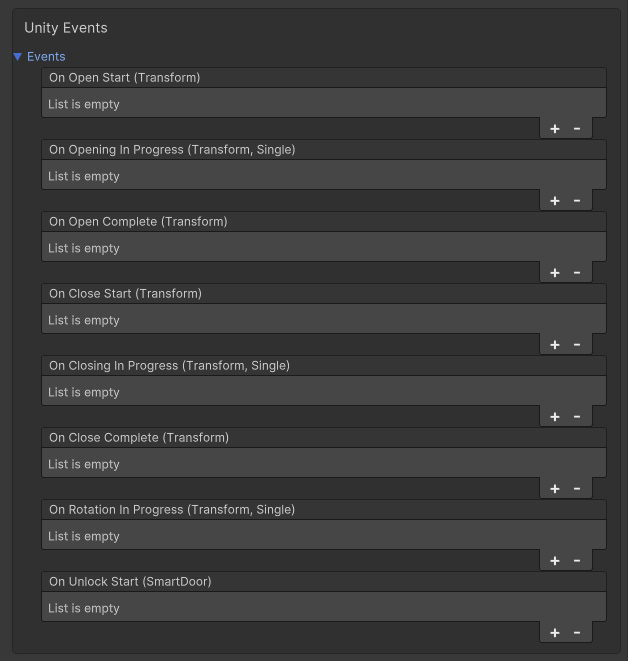
On Open Start: Triggered immediately after the door is instructed to open.
On Opening in Progress: Triggered each frame during the opening process, providing the progression ratio as a parameter.
On Open Complete: Triggered upon completion of the open operation.
On Open Close: Triggered right after the door is instructed to close.
On Closing in Progress: Triggered each frame during the closing process, providing the progression ratio as a parameter.
On Close Complete: Triggered upon completion of the close operation.
On Motion in Progress: Triggered each frame during the opening or closing process, providing the progression ratio as a parameter.
On Unlock Start: Triggered immediately after the
Unlock()method has been called.
Last updated